
The Fundamentals of Marksmanship
Posted by 80-Lower.com on Apr 27th 2021
We talk a lot about building ARs from scratch. But what good does that new rifle or pistol do you, if you can't effectively send those rounds downrange? If you're a new shooter or builder, chambering that first cartridge and pulling the trigger can be intimidating. It's not embarrassing to admit it. We've all started there. So today, we're covering the fundamentals of marksmanship (focusing on wielding the AR-15 platform, of course) using the original "Shooter's Bible." That'd be the U.S Army's FM-23-31, Chapter 5: Marksmanship Training.
The four marksmanship fundamentals you must master include:
- Shooting Stance: Your posture and grip behind the firearm
- Aiming Technique: How you point the muzzle at your target
- Breathing Control: How you breathe during each trigger pull
- Trigger Squeeze: How well you physically pull that trigger
#1: Shooting Stance
Getting your claws around the trigger and handguard is important, but so is your physical stance behind the gun. Whether your standing, sitting, or laying (prone), you need to turn your body into an extension of the firearm you're holding. Your entire frame should be stable for your sight picture and it should double as a buffer for recoil, allowing you to focus on good aiming and sending effective follow-up shots to make tight groupings.
Practice shooting while standing first.
Standing provides the least stable position. In fact, it's the toughest shooting stance to perfect. After all, you're not braced against a chair, table, or the dirt or floor beneath you. But practicing standing first will help you get comfortable with recoil and the other fundamentals more quickly. Get this right, and you'll have no trouble shooting accurately from a bench or the prone position.
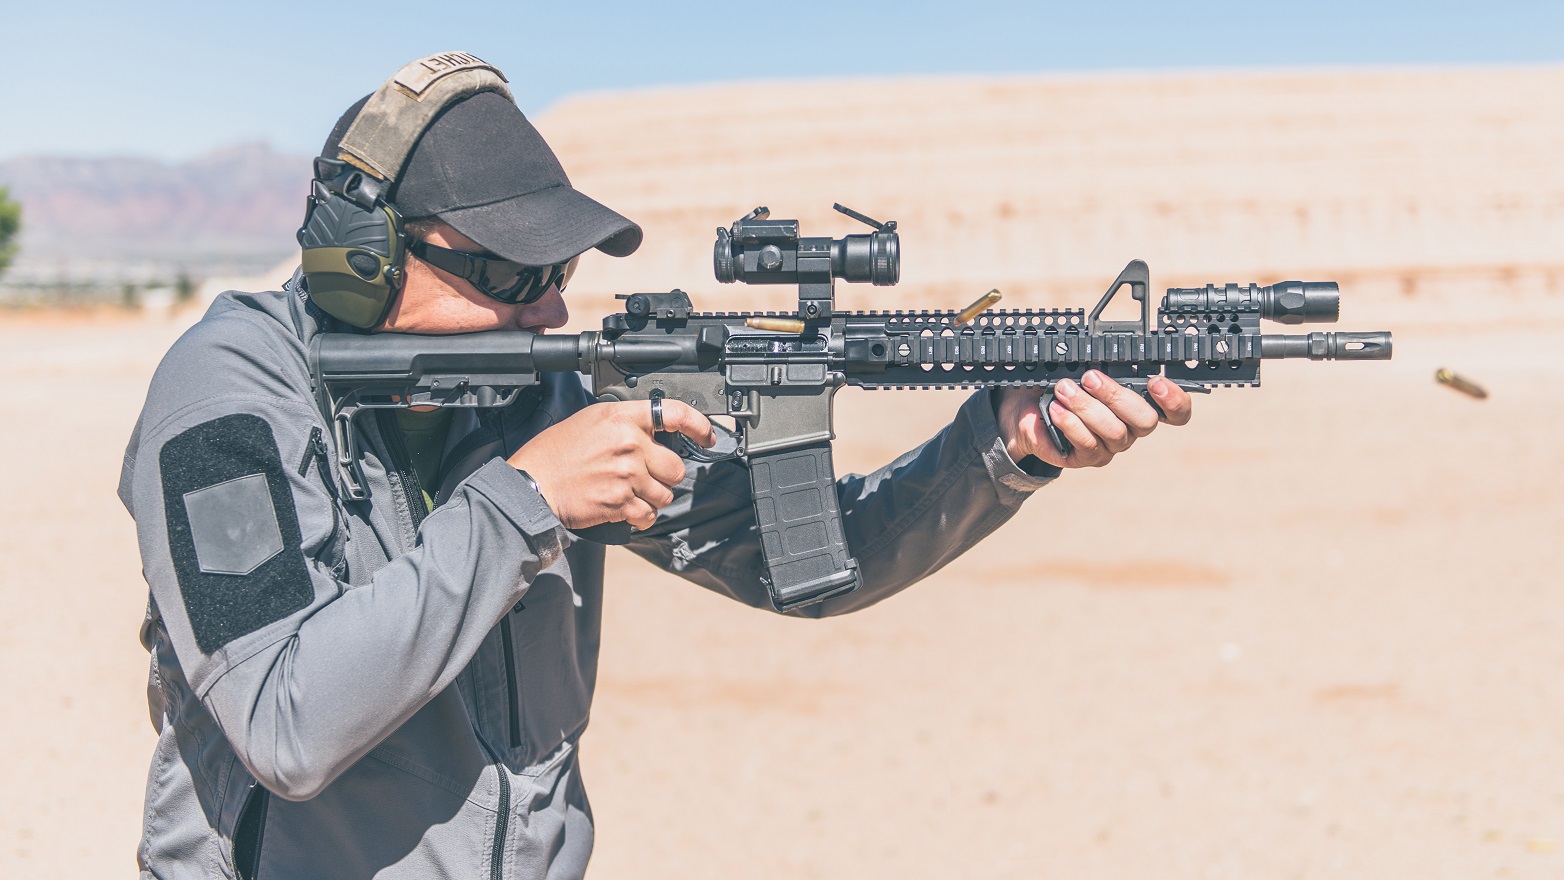
Best Practices For an Effective Stance.
These best practices and bad habits apply to all positions, not just standing. The shooter above is practicing an effective stance, while the shooter pictured below is exercising a poor stance.
Buttstock Position
Your buttstock should be pressed firmly into the upper-outer quadrant of your major pectoralis. That's the main chest muscle. As a guide, the top of your buttstock should be positioned in the middle of your left or right collar bone, depending on your handedness.
Firing Elbow
Keep the elbow of your trigger hand pointed down at the ground. This keeps your arm tucked toward your chest, causing your chest muscle to flex. In turn, this promotes good buttstock placement and helps to reduce felt recoil. It also helps eliminate bruising.
Non-Firing/Support Elbow
The elbow of the supporting hand should point close to 45 degrees to the ground, not off to the side or parallel to the ground.
Cheek placement
Your cheek should be planted firmly on the buttstock, with the bottom of your cheek bone contacting touching the stock. For AR owners, it can be confusing figuring out how far forward you cheek and head should rest. A general rule of thumb is to keep the tip of your nose within 2" of the charging handle at the rear of the upper receiver.
Feet placement
Your feet should be spaced shoulder-width apart. Both feet should be pointed in the direction of fire. We generally recommend using the "Weaver" stance while shooting a rifle or long gun when standing. The Weaver stance requires that the foot and leg opposite the rifle be placed forward, as if you're climbing a set of stairs. This allows you to more easily lean forward and into the rifle with a good, braced stance.
Avoid These "I'm-a-new-shooter" Habits.
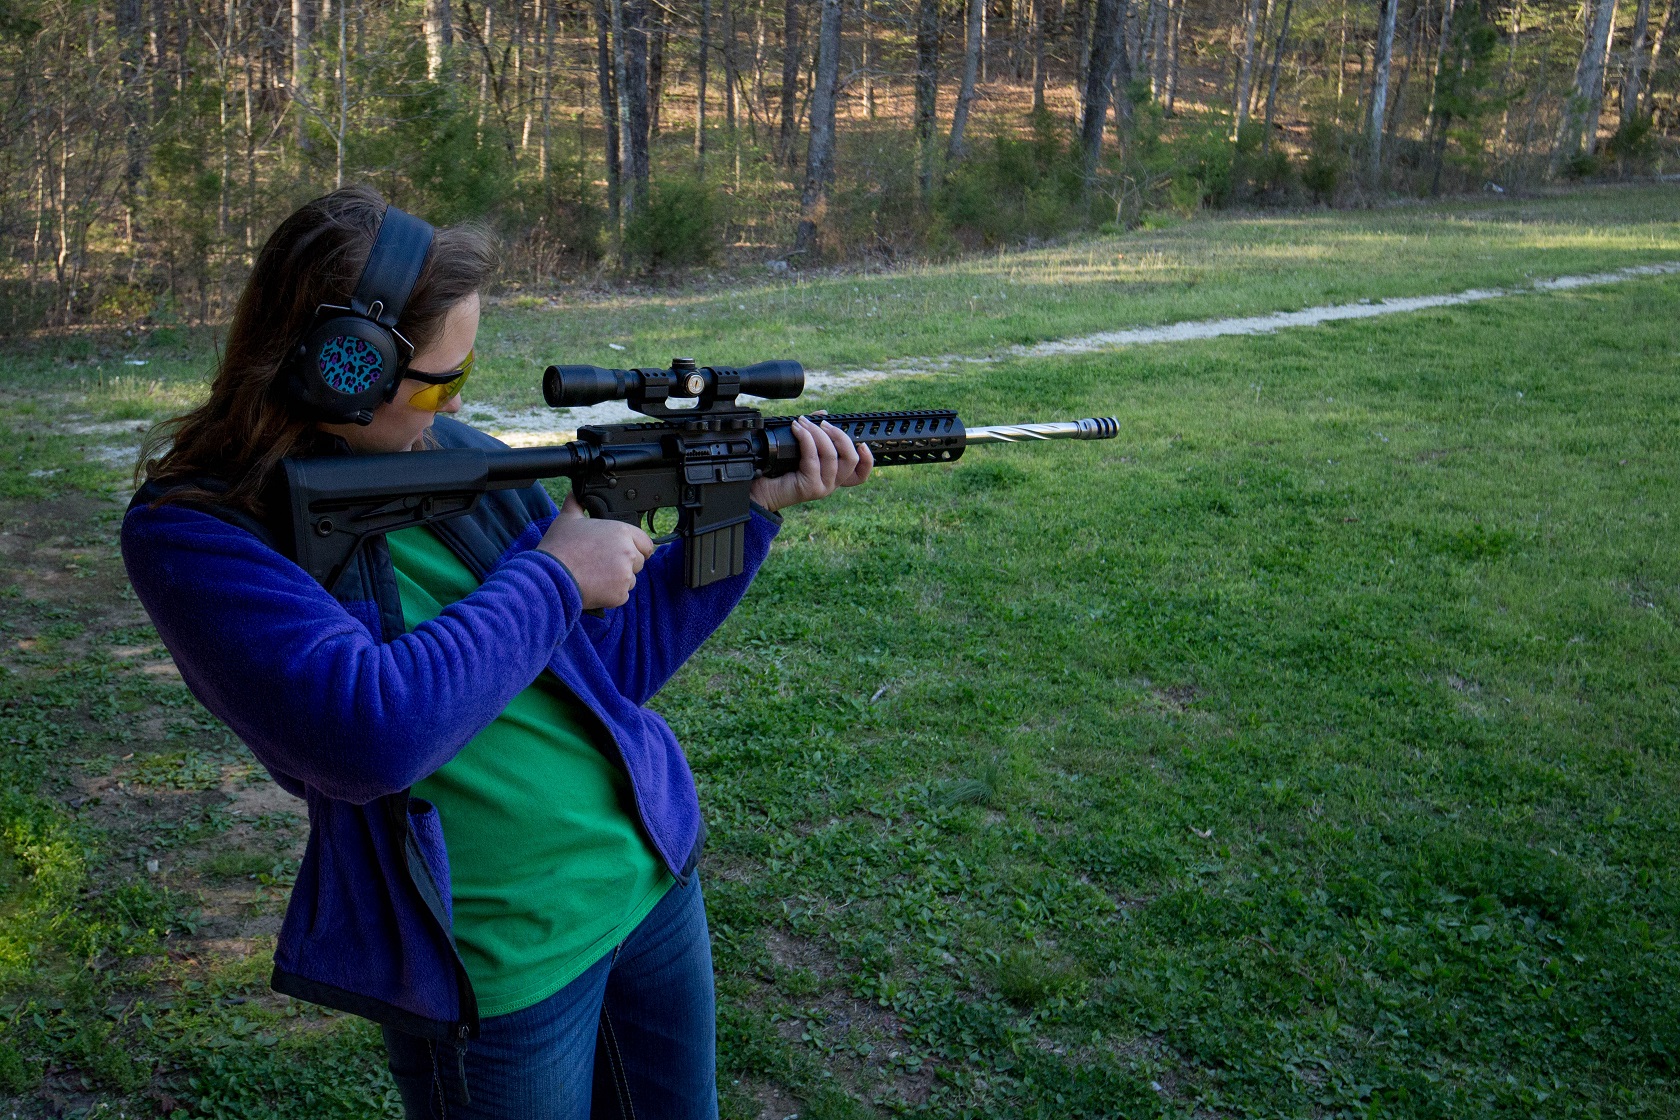 The infamous "lean-back"
Much like the shooter above, new shooters tend to lean backward and subconsciously try to "get away" from the rifle in their arms. This is not something to be embarrassed by. You're probably just focusing on that recoil coming your way, and the loud crack of a supersonic round leaving the muzzle. Wearing proper hearing protection is a must. This bad habit can also be helped by focusing on breathing and trigger squeeze, but we'll touch on that later.
Before you focus on the other fundamentals, make sure you're leaning forward and into the gun. If you look down and can't see your feet, you're leaning back. Focus on foot placement and buttstock placement. This will allow you to easily overcome this this bad, new-shooter habit.
Not tucking the buttstock
Because our new shooter's leaning back and not focusing on stance, her buttstock is barely touching her major pectoralis. It's floating near the armpit and shoulder, barely contacting the shooter's body. This will result in the rifle slamming into bone, thin muscle, and tendons from recoil. This is how you wind up with bruises from a buttstock.
Death grip (or a weak grip!)
There's a "Goldilocks" zone to be found in properly gripping your AR-15. A death grip will make a proper trigger pull impossible, and recoil will go into your hands and wrists more than your shoulders. Inversely, limp wrists and a weak grip will allow your muzzle to fly all over the place while aiming and firing. A firm but flexible grip is all you need to properly handle your AR.
#2: Aiming
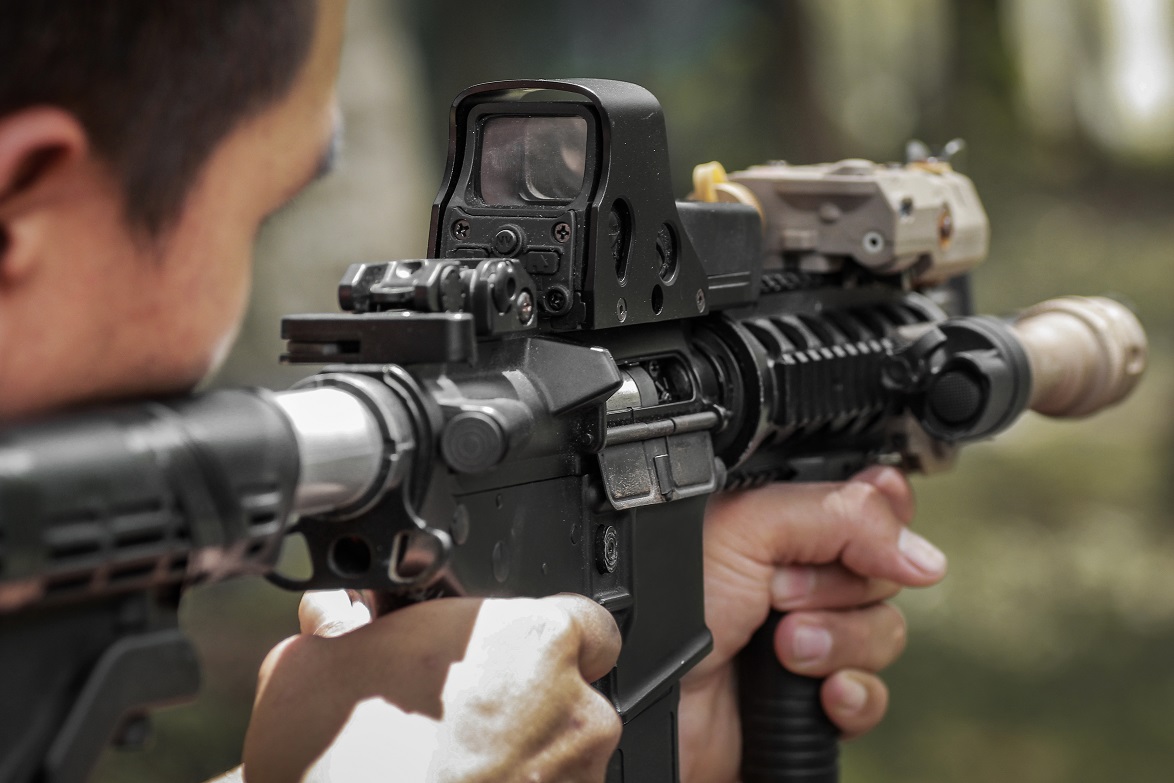
Now that you know how to get confident with a proper shooting stance, it's time to figure out how to aim effectively. Luckily for new shooters, red dots and reflex sights have become the most popular method of obtaining good aim with an AR-15. These sights are parallax-free. That means no matter where your head or eyeball's located behind the optic, the round will land wherever the laser-projected dot inside the optic is pointed.
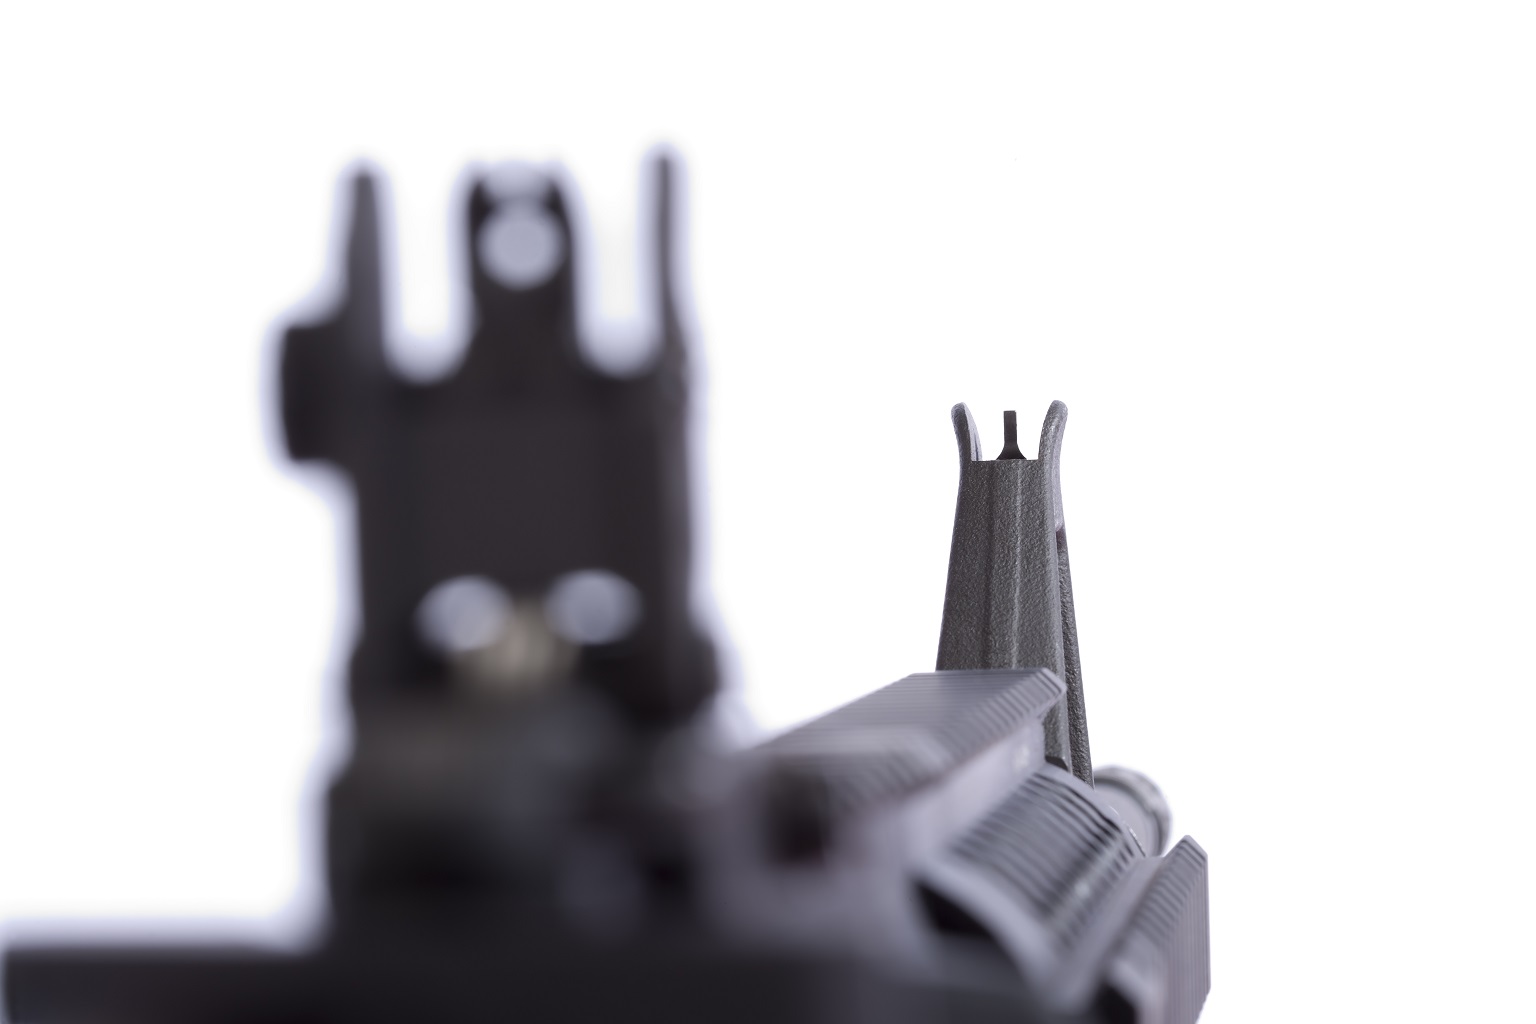
But understanding the fundamentals of good aim are important, especially when you're using iron sights like on the AR shown above. Using traditional sights like these involves much more than just pointing and shooting. Some of these best practices are counter-intuitive and require practice.
Best Practices for Good Aim
Aim with both eyes open
Virtually every time you've watched someone aim a firearm, you've probably seen them close their non-aiming eye. Although this isn't technically wrong, it causes an unnecessary strain that makes achieving a proper sight picture more difficult. Keeping both eyes open will allow you to more easily focus on the iron sights. Speaking of focus...
Focus on the front sight post.
Iron sights are only effective when the front sight post is the focus of your aiming eye. Do not focus on the rear sight, which is closest to you, nor the target itself. Focusing on the front sight post ensures the post is perfectly centered within the ring of the rear sight. This ensures the muzzle is matched with where you intend to land rounds downrange. Although the target itself may appear blurry, you will still be able to effectively place the point of aim on the target. This is also called matching POA with POI: Point of aim equals point of impact.
Don't aim for too long.
Taking too long to aim will cause eye fatigue, especially if you're trying to squint with one eye closed. You should try to spend less than 4 to 5 seconds aiming before squeezing off a round. Any longer, and you'll struggle with your sight focus and ultimately wind up off-target, anyway.
Follow through.
You will flinch when you send your first rounds downrange. You will close your eyes and want to turn away from the muzzle blast and crack of the bullet. But you must work as hard as possible to "follow through" and keep your eyes trained on your sights and target with each trigger pull, just like you would with any swing of a bat or club. This will promote better sight picture, better retention of your shooting stance and grip, and ultimately provide for quicker follow-up shots which means better accuracy.
#3: Breathing
Breathing plays a huge role in shooting accurately and most importantly, consistently. You'll likely be nervous or excited the first few times you step behind the trigger. Even experienced shooters get a rising heart rate and fast breath when the mag's loaded. Take a moment to get situated in your shooting stance, and slow your breathing.
Best Practices for Breathing
Take slow, deep breaths.
With practice, you can develop a good cadence of firing in line with the pace of your breathing and that 4-to-5-second timeframe of honing your aim. Slow your breathing so you're inhaling and exhaling deeply and slowly within that same amount of time.
Pull the trigger on the exhale.
As you inhale, oxygen rushes to the lungs and bloodstream, increasing your heart rate. This can also throw off placement of your buttstock and cause you to feel lightheaded if you try to focus on aiming, firing, and inhaling all at once. Instead, exhale deeply and then squeeze the trigger. This will slow your heart rate and tighten up your chest muscles, providing more stability.
Take a breath between each shot.
Pretty self-explanatory: Try to time your shots between each exhale and point of inhale. This will help force you into that smooth, consistent cadence of breathing, aiming, exhaling, and squeezing the trigger before resetting for the next shot.
Don't hold your breath.
The other reason you shouldn't squeeze the trigger while inhaling is because this tends to cause shooters to subconsciously hold their breath. You're also likely to tense your muscles, feel lightheaded, and lose focus if you hold your breath while trying to aim and fire.
#4: Trigger Squeeze

Finally, the moment of truth: We've focused on how to not move while shooting, which is pretty simple. Squeezing the trigger and doing it the right way isn't easy. This is the moment where you practice incredibly precise and controlled movements knowing an explosive is about to detonate above your hand and in front of your face. This is why trigger squeeze is the hardest fundamental to master.
Best Practices for Good Trigger Squeeze
Pull with the middle of your fingertip.
The middle of your fingertip is typically where you'll find the center of your fingerprint's swirl, or point. This is where your should place your pointer finger on the trigger. Most triggers have a pull weight of 3 pounds to 8 pounds, so you may need to develop some strength in your trigger finger to effectively squeeze the bow without using that first joint of your trigger instead. Many new shooters "hook" the trigger with their finger joints, which tends to pull the muzzle off-target during the squeeze.
Use one smooth motion.
The trigger pull gets more difficult the closer you get to the point of the hammer falling. This is because the tension in the trigger spring increases the more the trigger travels rearward. You'll need to practice pulling the trigger in a single, smooth motion that allows you to overcome this ever-increasing tension.
Don't anticipate the hammer falling.
The problem with being able to feel the increasing tension of the trigger as you squeeze it is two-fold: It also allows you to feel when the hammer is about to drop. Many new shooters flinch or anticipate this moment, which tends to cause a jerky trigger finger. Try to ignore this anticipation. With a truly smooth trigger pull, the moment the hammer drops should come as a surprise. This help prevent you from subconsciously pulling the muzzle off target by tensing up or flinching.
Don't slap the trigger back and forth.
This issue tends to build on the fact that the hammer can be anticipated, and that trigger pull weight can cause finger fatigue. Many shooters try to compensate for these two challengs by slapping the trigger. That is, yanking on it as hard and fast as possible, then releasing quickly. This is called "slapping" the trigger and it's just about the worst thing you could do for accuracy. Resist this urge, and focus on breathing through that smooth pull and surprise hammer fall instead. Holding the trigger in the rearward position after the hammer falls also helps to prevent this quick-n'-dirty trigger squeeze.
DISCLAIMER: If you are new to the world of DIY gun building, you likely have a lot of questions and rightfully so. It’s an area that has a lot of questions that, without the correct answers, could have some serious implications. At GunBuilders.com, we are by no means providing this content on our website to serve as legal advice or legal counsel. We encourage each and every builder to perform their own research around their respective State laws as well as educating themselves on the Federal laws. When performing your own research, please be sure that you are getting your information from a reliable source.