
How to Install a Drop-in Trigger
Posted by 80-Lower.com on Feb 14th 2023
You've finished putting together your 80% lower or stripped AR lower. You sent some rounds downrange, and you're happy with the performance -- mostly. Maybe that stock trigger isn't as crisp as you'd like. A decent trigger can make a big difference in your ability to land tight shot groups.
That's why a drop-in trigger should be one of the first upgrades you install on your new AR. Also called a "cassette trigger," drop-in units are precisely machined to reduce creep, take-up, over-travel, and pull weight. These are all the factors that can make a trigger feel "mushy" and inconsistent.
For this install, we're using the Single-Stage Black Ops Trigger from James Madison Tactical. It sports a flat trigger bow and a lighter pull weight than factory parts kits.
How to Install Drop-in Trigger
First, you'll need some basic tools:

Gunsmithing Hammer.
A small gunsmith hammer is needed to remove your factory trigger and hammer pins from the receiver. The hammer's polymer head will prevent damage to your receiver while tapping the pins out.
Pin Punch.
The pin punch will easily drive the hammer and trigger pins out with your hammer, ensuring the pin holes aren't marred or damaged.
You can get both the needed punches and a gunsmith hammer with the Real Avid Punch Set. We recommend investing in a set like this; it'll be useful for installing other receiver upgrades and lower parts kit components.
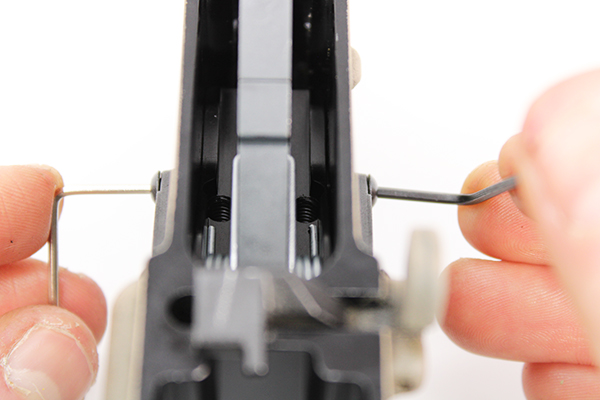
1. Remove Factory Hammer and Trigger
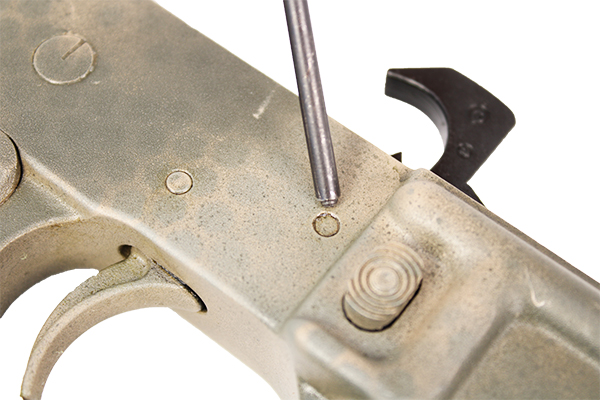
The AR's factory hammer spring rests atop the trigger pin, so the hammer needs to be removed first. Release the hammer so it is upright. Then tap on the hammer pin using a punch and hammer. Even when not cocked, the hammer spring is under tension. So, be sure to hold the hammer assembly as you remove pin.
With the hammer and spring removed, repeat the process to remove the trigger and disconnector. The trigger pin is the same diameter as the hammer pin; the same punch should be used to remove it.
The trigger and disconnector may separate once the trigger pin is removed. Take care to ensure you do not lose the disconnector spring, as it can easily fall out of the trigger.
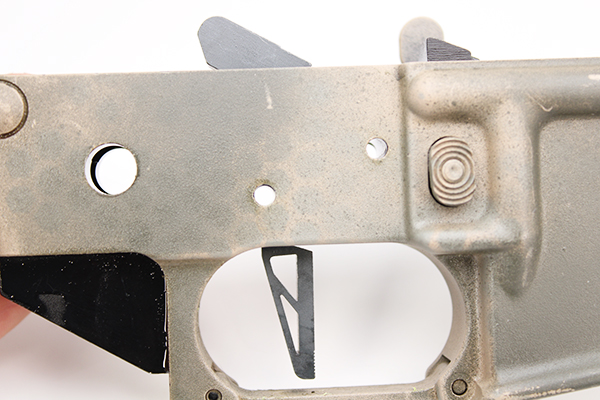
2. Remove the Safety Selector Lever
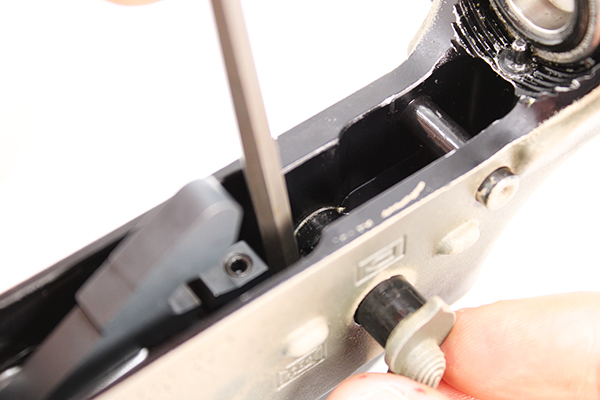
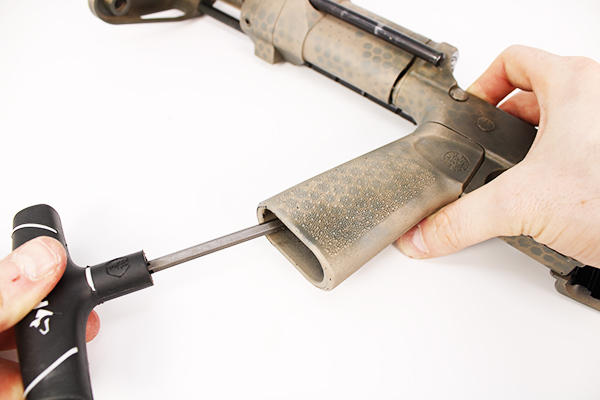
The safety selector lever will typically prevent a drop-in trigger from seating because of clearance issues. To remove the safety lever, the detent and spring capturing it in the receiver needs to be removed. To do this, you must remove the pistol grip.
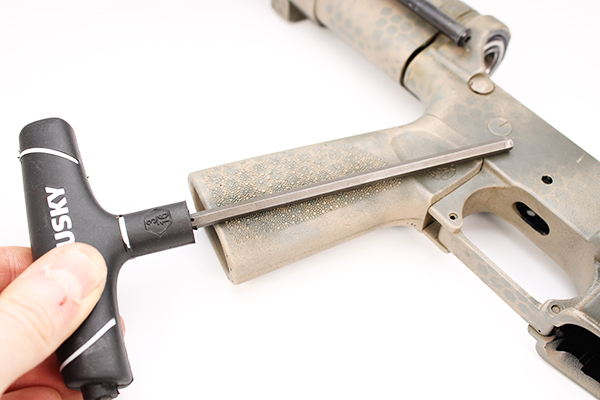
Virtually all AR-15 pistol grips are secured to the lower receiver with a hex-head bolt and washer. The bolt is accessed via the bottom of the grip. You must use a long hex wrench or socket wrench with an appropriate hex-head socket to remove the bolt and washer.
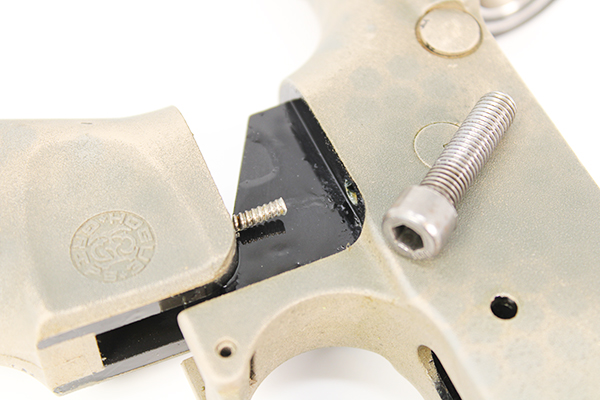
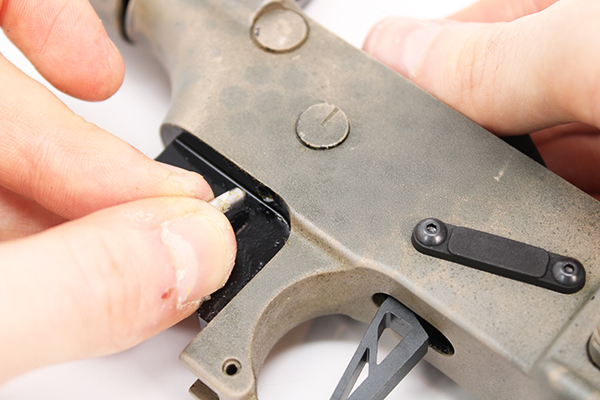
With the bolt removed (pictured above) the grip can be slid off the lower receiver. Resting atop the grip, in a small hole, is a spring. This spring captures the safety lever detent in the lower receiver. Take care not to lose this spring as you remove the grip.
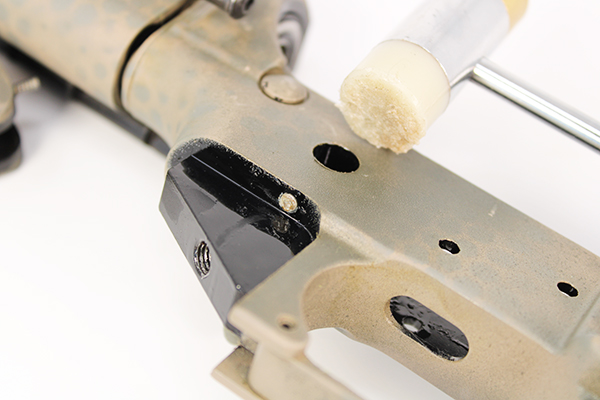
The safety lever detent may be stuck inside the lower receiver. You can dislodge it by gently tapping on the top of the receiver wall, above the hole, with the polymer head of your gunsmithing hammer.
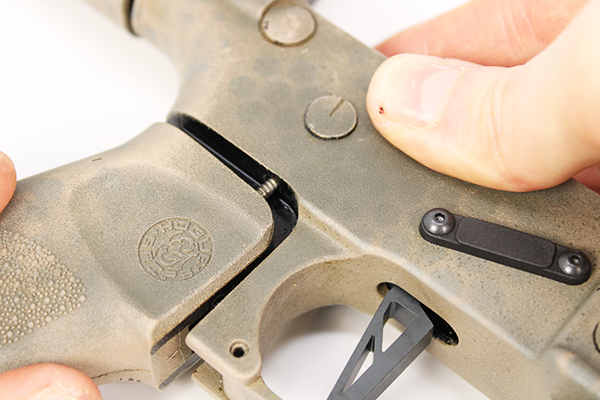
With the detent removed, you can now pull the safety lever out of the lower receiver.
![]()
Your lower receiver's fire control cavity is now ready for the drop-in trigger. Before placing the new trigger unit in the receiver, clean the fire control cavity. Remove any debris and carbon fouling from the floor and walls of the cavity. Ensure no debris is present in the threaded hole for the pistol grip, to ensure it doesn't cross-thread upon re-installation. Lightly oil the cavity, too.
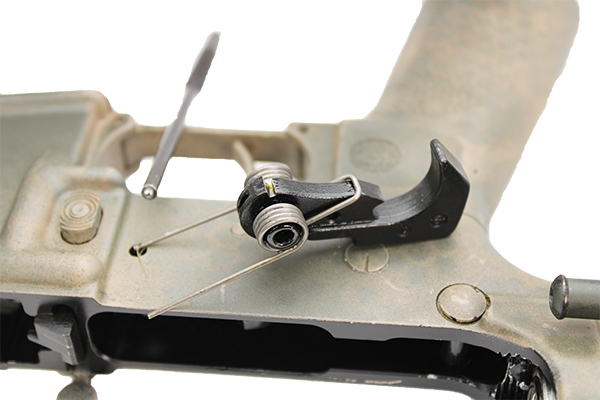
3. Insert The Drop-in Trigger
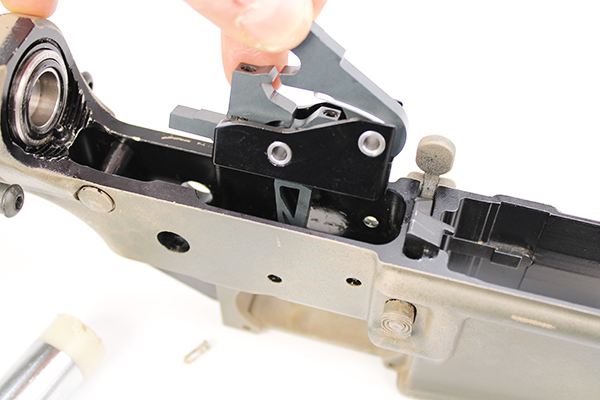
Orient the drop-in trigger so the hammer and trigger bow are facing the bolt catch and magazine well. The hammer should be cocked before installation. Cocking the hammer helps provide clearance when reinserting the safety lever. Lightly oil both the hammer and trigger pin holes in the drop-in unit before inserting it in the receiver.
With the drop-in trigger seated in the fire control cavity, verify both the hammer and trigger pin holes align with the holes on the receiver.
If the trigger rests too deep inside the receiver and the pin holes are misaligned, you can increase the trigger's resting height by installing and adjusting the provided set screws on the bottom of the trigger's casing.
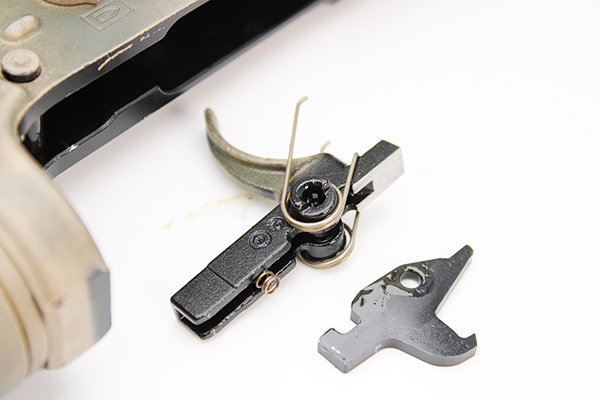
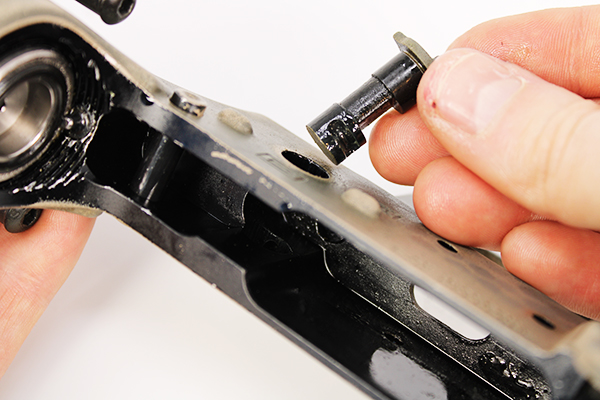
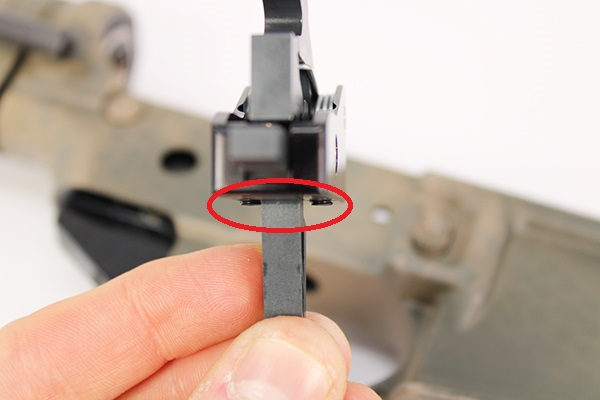
4. Install The Anti-Walk Pins

The JMT Black Ops Trigger -- and most other drop-in triggers -- come with upgraded "anti-walk" pins. These pins are captured on either side of the lower receiver with two small plates and hex-head bolts. This ensures neither the hammer nor trigger pin slides out of the receiver during live fire.
To prep the pins for installation, install both pins onto one side of the pin plates with the provided hex bolts, as shown below.
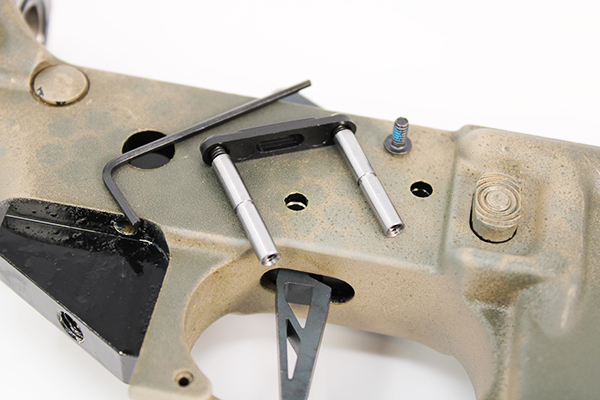
With the drop-in trigger pin holes aligned, insert both the trigger and hammer pins through the trigger and receiver.

Press the pin and plate assembly through the trigger and receiver until the plate is flush against the exterior of the lower receiver.
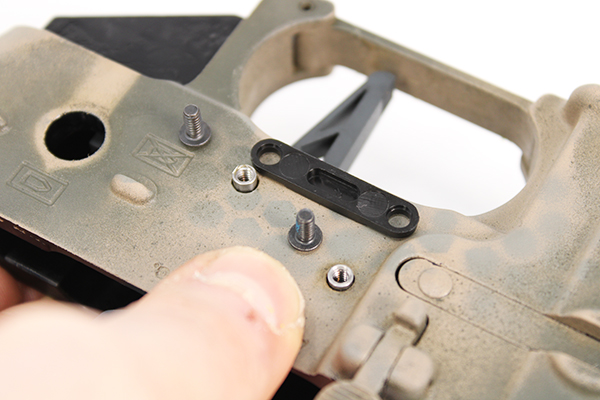
On the opposite side of the receiver, install the remaining pin plate and secure it to the pins with the remaining hex-head bolts.
To tighten the hammer and trigger pin bolts, you will need two Allen keys. Hold one side of the pins' bolts with one key, and rotate the bolts on the opposite side to tighten them. Tighten both pins' bolts until both plates are flush against the receiver's walls.
5. Reinstall Safety Lever, Detent, and Grip
First, reinstall the safety selector lever. You may need to gently press down on the rear portion of the trigger's disconnector to provide adequate clearance for the lever.
Once the safety lever is fully seated, rotate it into the "FIRE" position. While holding the lever in place, reinsert the lever's detent.
Next, slide the pistol grip back onto its mount. While doing so, ensure the safety detent spring is aligned with the detent so it is properly captured.
Finally, reinstall and tighten the pistol grip's screw and washer.
Your drop-in trigger installation is complete!
Perform a Function Check of New Trigger
You should verify your trigger functions correctly before attempting to fire live rounds. To do this, release the safety with the hammer cocked. Place light pressure against the face of the hammer, to prevent it from striking the receiver and damaging it.
With the hammer lightly held, pull the trigger. The hammer should release. Release the trigger, and depress the hammer, cocking it again. This time, pull the trigger but maintain pressure on the trigger after the hammer releases.
While holding the trigger in the rearward position, depress the hammer. The disconnector should capture the hammer, keeping it cocked. Now, release the trigger. There should be an audible click, as the disconnector hands the hammer off to the trigger. The hammer should remain cocked.
Reengage the safety confirm it functions correctly. If your drop-in trigger performs the above steps without issue, you're ready to reinstall your barreled upper assembly, and hit the range.
DISCLAIMER: If you are new to the world of DIY gun building, you likely have a lot of questions and rightfully so. It’s an area that has a lot of questions that, without the correct answers, could have some serious implications. At GunBuilders.com, we are by no means providing this content on our website to serve as legal advice or legal counsel. We encourage each and every builder to perform their own research around their respective State laws as well as educating themselves on the Federal laws. When performing your own research, please be sure that you are getting your information from a reliable source.