
How to Duracoat Camouflage an AR-15
Posted by 80-Lower.com on Aug 3rd 2021
You bought or built a shiny new AR-15. Congratulations! But it looks just like every other AR out there. What do you do? You paint it. But how? Easy: We're going to show you how to use Duracoat - a popular gun coating that now comes in a rattle can - and some simple vinyl stencils to produce your own custom AR-15 finish.
FAQs
Q: What is Duracoat, exactly?
A: Duracoat is not just regular old spray paint. It's a two-part chemical coating (color and hardener) that is self-etching. That means it uses a very mild acidic compound to bond with the surface you're painting. This also helps thin out the final coating, which makes it smooth and uniform.
Q: What can I spray Duracoat on?
A: You can use Duracoat on just about any firearm surface: Steel, aluminum, polymer, carbon fiber, wood, you name it. Duracoat also bonds well with existing gun coatings: Anodizing, nitriding, parkerizing, bluing, and existing painted surfaces.
Q: I heard about Cerakote. Why use Duracoat?
A: Cost and the ability to do it yourself. Cerakote is expensive. It requires sandblasting and oven curing, and professional paint equipment to apply it. It can't be easily applied at home, so you need to pay a gunsmith or certified applicator. Duracoat can provide similar performance and an equally attractive finish.
Q: Do I need to disassemble my rifle to paint it?
A: Only if you don't want certain parts painted. Duracoat can be applied to a fully assembled firearm and it won't gum up triggers, buttons, safeties, or levers. We're doing a full-coverage black and blue camouflage job with our AR-15, so we won't be disassembling anything.
Q: What is the cure time for Duracoat?
A: Duracoat dries to the touch in 1 hour. You should let your paint job sit overnight before reassembling parts. Duracoat takes approximately 4 weeks to fully cure. This cure time can be accelerated with high heat and a dry environment.
Q: What if I want to remove Duracoat?
A: Duracoat can be removed by soaking the firearm or painted parts in acetone or Klean Strip for about 15 minutes. This will break the chemical bond between the paint and the firearm's surface. It can then be removed with light scrubbing.
Q: I have over-spray or orange peeling. How do I fix it?
A: Duracoat can be lightly sanded once fully cured. You can use 1,000-grit sandpaper to remove orange peel and over-spray. Light sanding can also remove any glossy spots to achieve a uniform, matte finish.
Types of Duracoat
You can buy this paint in separate containers - the color and hardener - and then mix them and use an airbrush or HPLV gun to apply it. The simpler method is found in Duracoat's aerosol cans. They contain the paint and hardener in one canister, allowing you to mix and spray with no other equipment.
You can buy Duracoat as standalone colors (standard and tactical) or you can buy a full camouflage kit. We're making up our own camouflage kit today, something this writer has dubbed "Urban Winter Multicam". To achieve this color combo, we're using HK Blue Gray and NWU Light Blue. Both aerosol colors can be found here.
Tools and Required Stuff
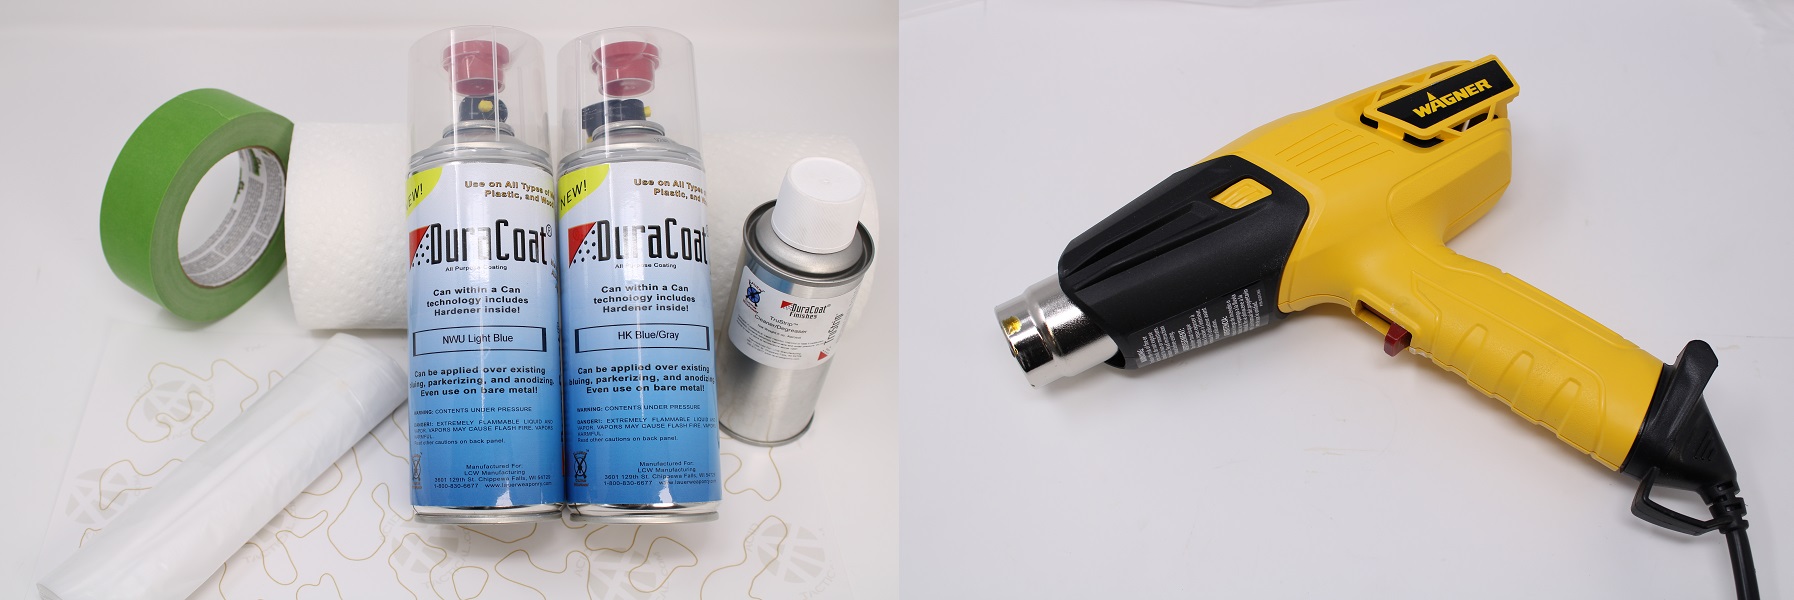
They say 80% of a good paint job comes with prep work and using the right tools. Here's what you'll need to make the job easy:
De-greasing Agent : You need to prep your firearm's surfaces by removing all grease and contaminants. You can buy a little can of de-greaser from Duracoat when you buy your paint. It's the silver can shown above.
Acetone: If you're painting an AR-15 like we are here, then you probably have a lot of oil in the upper and lower receivers. Oil will seep out of the pin holes and charging handle, ruining your paint. To prevent this, we strongly recommend flushing the receivers by pouring some acetone through them. Don't worry, this won't ruin anything.
Painter's tape: You should tape up any parts you don't want painted. We like using Frog Tape because it holds a nice edge that won't allow paint to bleed through. We're using it to tape up our barrel.
Plastic tarp: Any aerosol paint can hang in the air and stick to walls, furniture, or vehicles. We recommend setting up a contained area with plastic tarps to prevent paint from getting everywhere.
Paper towels: Paper towels work great for stuffing up things like muzzles and ejection ports, to prevent paint from getting inside. Our AR doesn't have a dust cover, so we're filling the receiver to protect the inside.
Heat gun: Although not necessarily required, using a heat gun can make the difference between a mediocre finish, and a professional paint job. Duracoat off-gasses and binds to the surface by expelling chemicals. A heat gun will dramatically improve this process in between coats and ensure adheres in thin, even layers with a uniform finish.
String or wire: To make painting easier - and to prevent contact with your painted surfaces while they dry - you should use string or wire to hang your rifle, pistol, or the parts to be painted.
Latex gloves: Once you de-grease your firearm, you cannot handle it with bare hands. Any oil from your hands will ruin the paint when applying it. You also don't want de-greaser on your bare skin. Grab some basic nitrile latex gloves.
Vinyl Stencils: To apply a camouflage pattern, you'll need adhesive vinyl stencils. Popular patterns like Multicam, Kryptek, woodland, and mesh patterns tend to cost around $15 to $25. We're using Multicam stencils from Acid Tactical.
How to Camouflage an AR-15 with Duracoat
1. Prep, Tape, De-grease
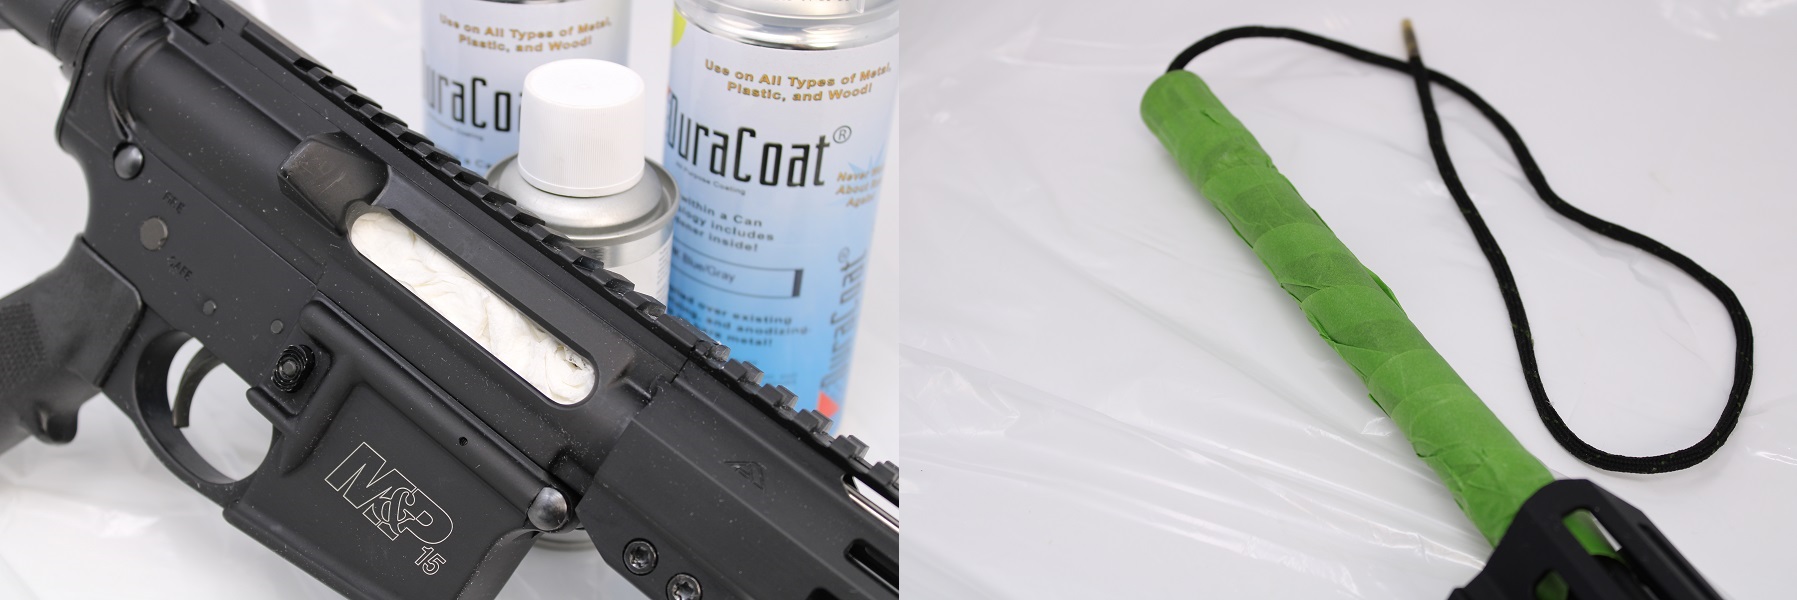
First, cover up any parts you don't want painted. Since our AR-15's got no dust cover, we pulled out the bolt and covered up the inside with paper towels. We also taped the barrel, and we threaded some string through the receiver and out the muzzle. This will allow us to keep the rifle upright and spin it freely while we paint.
Once parts are covered or taped, thoroughly de-grease all surfaces to be painted. We soaked the rifle in acetone to remove stubborn oil deposits, then we hit the exterior surfaces with Duracoat's de-greasing agent. At this point, keep your gloves on and don't handle the firearm with bare hands.
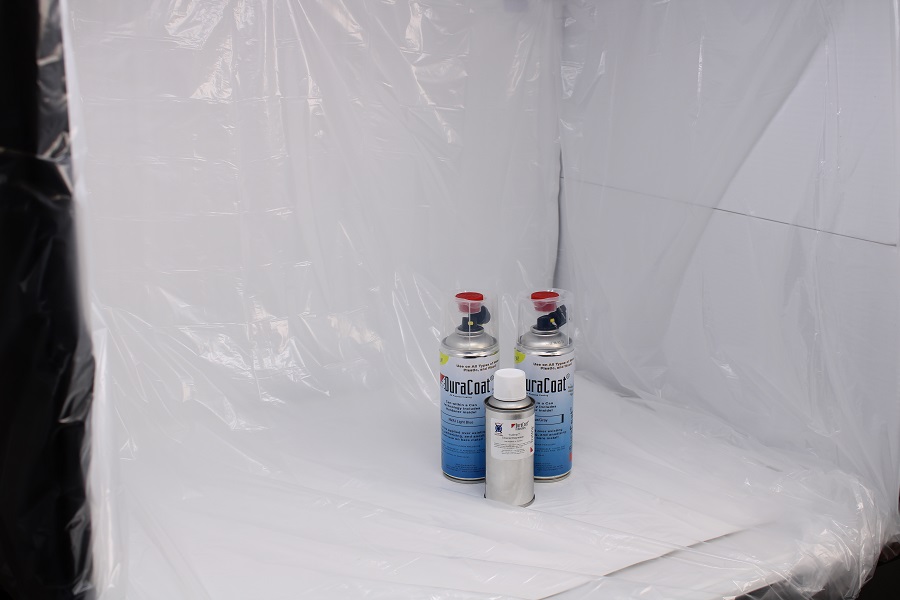
Set up your paint area, too. We're using a photographer's light box protected by clear plastic painter's tarp. This gives us an enclosed space to contain extra paint spray, and it gives us plenty of bright light to clearly see what we're doing.
2. Apply Camouflage Stencils

Once de-greased, your rifle's surfaces will easily take and hold vinyl camouflage stencils. Vinyl works work great. It has just enough adhesive to mold around corners, bends and curves. It does a great job preventing any bleed-through. It also peels off quite easily once the paint has set, leaving clean lines. We're applying the stencils before we spray Duracoat, because we want some of our AR's original black anodizing to show through the camouflage shapes.
3. Prep The Duracoat Aerosol Cans
This step is critical.
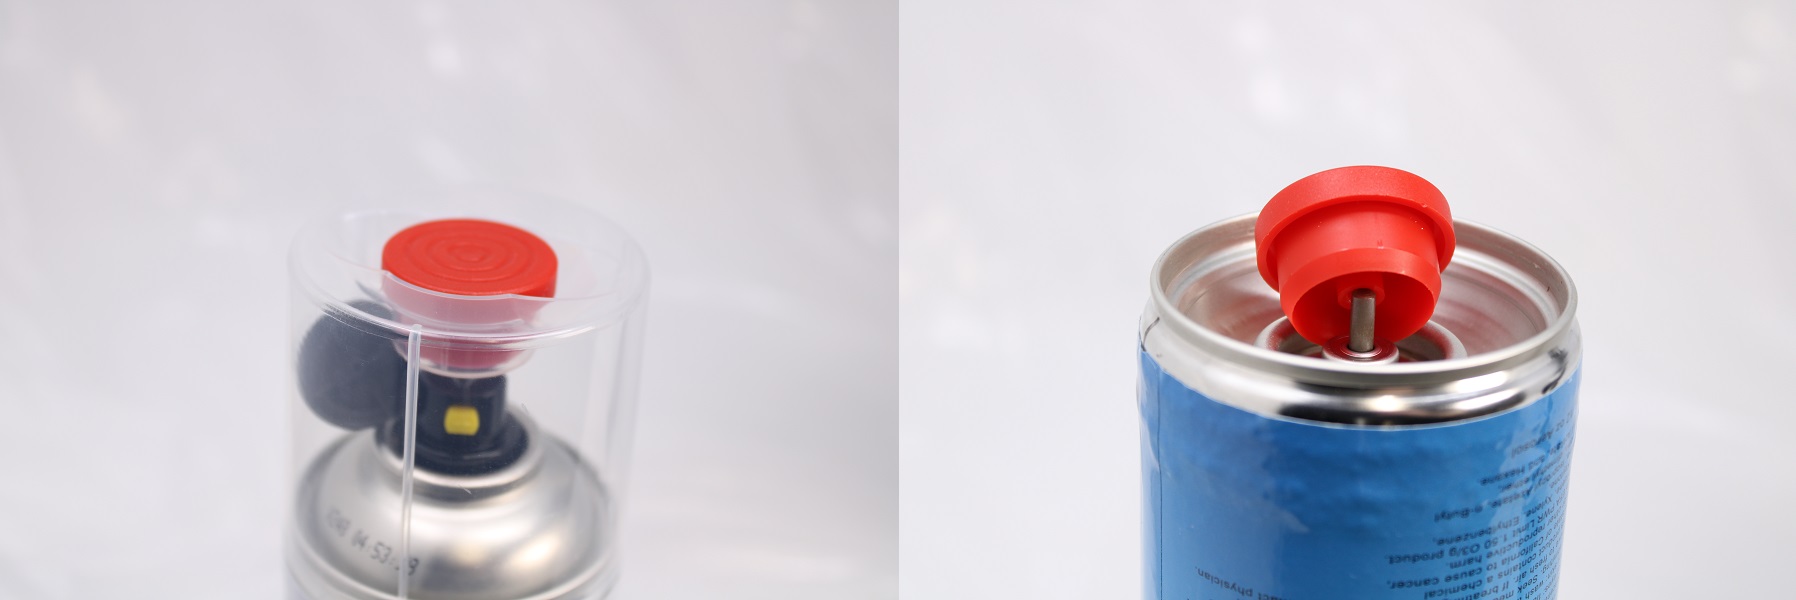
Duracoat's aerosol cans come with the paint and hardening agent in the same can, but separated by a barrier. First, thoroughly shake the paint for three minutes. Then, using the red button atop the can, you must puncture the inside barrier to allow the paint and hardener to mix. On the bottom of the can is a metal plunger. It takes quite a bit of force to press the plunger in. You will feel a pop once you've punctured it. Next, you need to thoroughly shake and mix the paint and hardener for an additional three minutes to achieve a good spray.
Don't half-ass this step, or your paint will come out poorly and you won't achieve an even, thin, durable coating.
4. Apply Light Coats at 4" to 8"
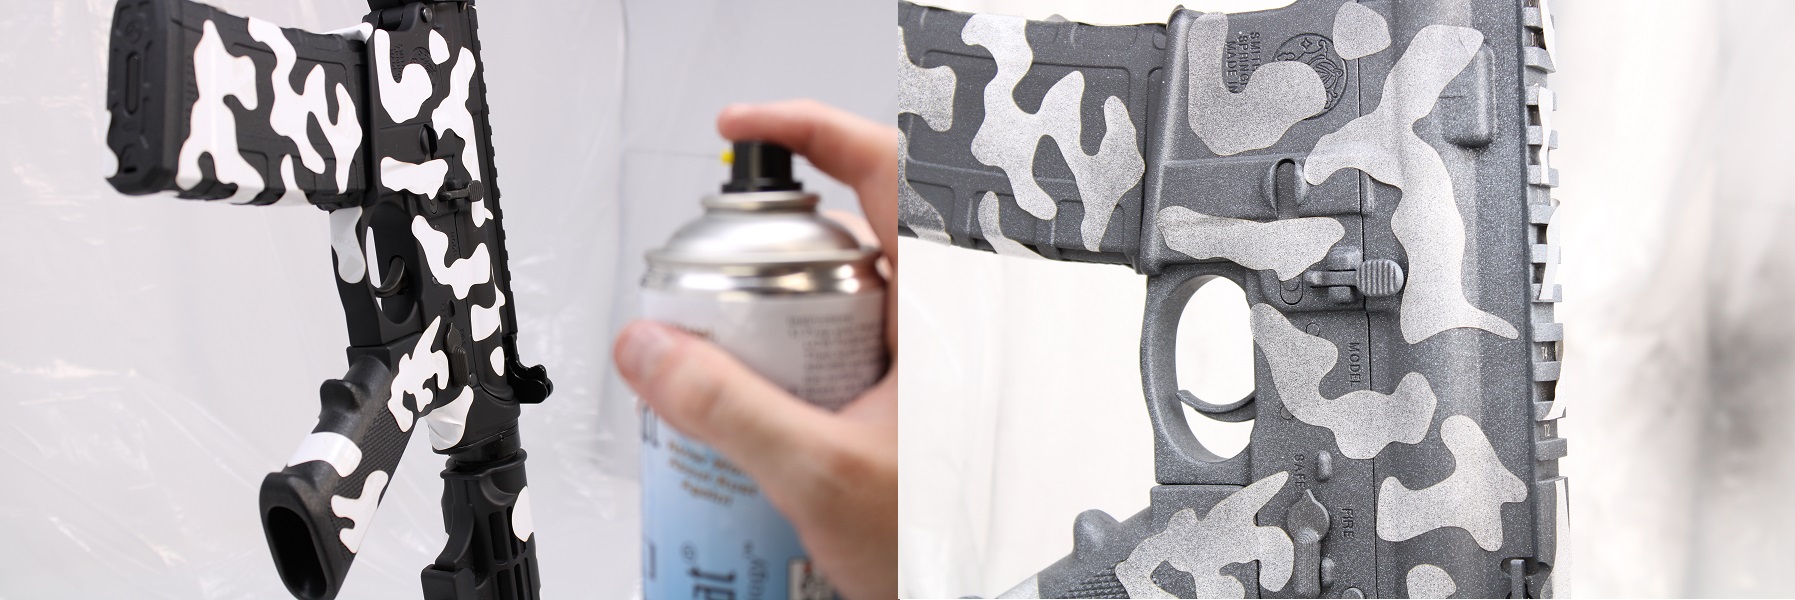
Spray the rifle from about 4" to 8" away. We recommend starting out further away and moving in closer as needed to obtain coverage. Make light passes. Our primary color is dark blue, but you can see our white vinyl stencils have only become pale gray after the first pass. The more thin coatings you apply, the better your finish ultimately will be. Spray too closely, and you'll wind up with over-spray, orange peeling, and paint that won't cure and harden.
5. Wait 10 Minutes Between Coats (Use Heat!)
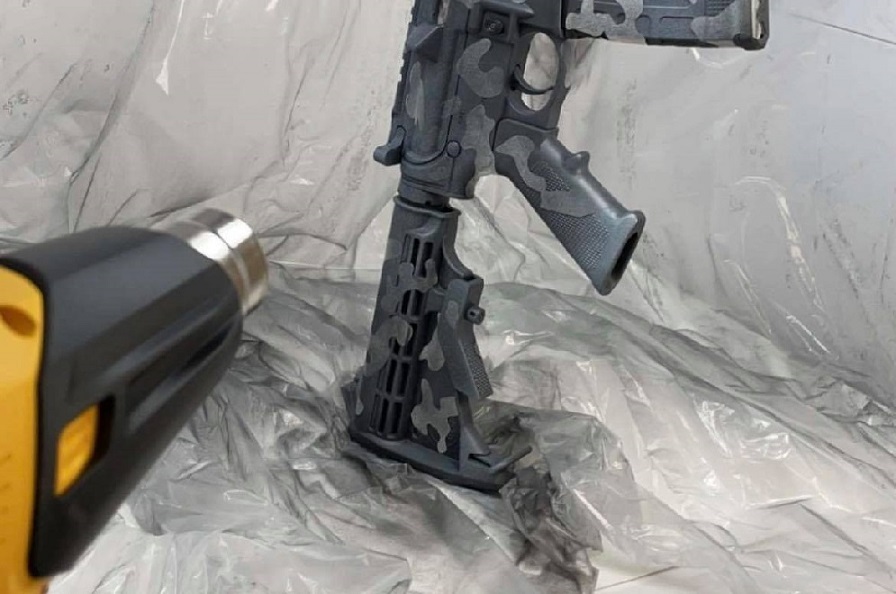
Use a heat gun between each coat to promote the paint's immediate cure / off-gassing, and wait at least 10 minutes between each coat. Even a regular blow-dryer will help promote the cure of each layer. Just don't tell the wife.
IMPORTANT: If you're using a heat gun with vinyl stencils, be careful not to bake the stencils. Too much heat will cause them to shrink and fall off. Go over the entire rifle in passes on medium heat. Never keep the heat gun aimed at one spot continuously. Keep at least 10" to 12" away from the surface.
6. Wait 1 Hour to Peel Stencils
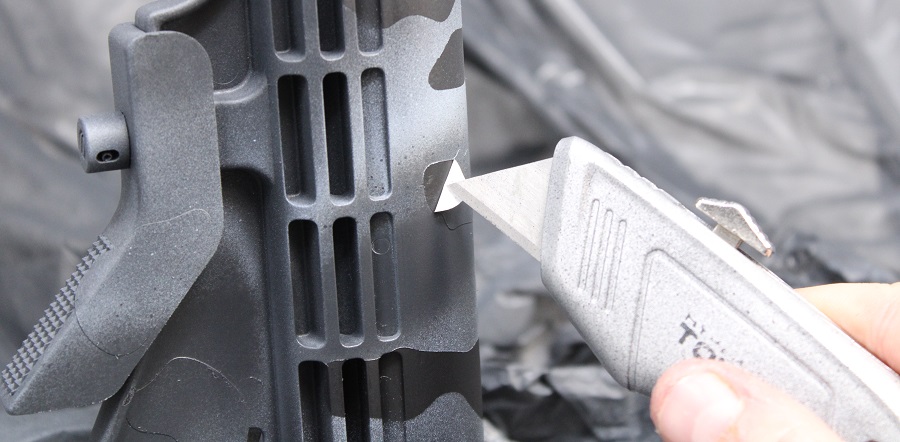
Duracoat takes 1 hour to dry to the touch. This could take longer if you're working in a cold, humid environment. After the paint's dried enough to handle, you may begin peeling your stencils to reveal your camouflage pattern. We recommend using a razor blade to do this. Avoid gumming up the paint by repeatedly touching it. Even with gloved hands, you can compromise the finish until it's fully cured.
Enjoy Your Paint Job!
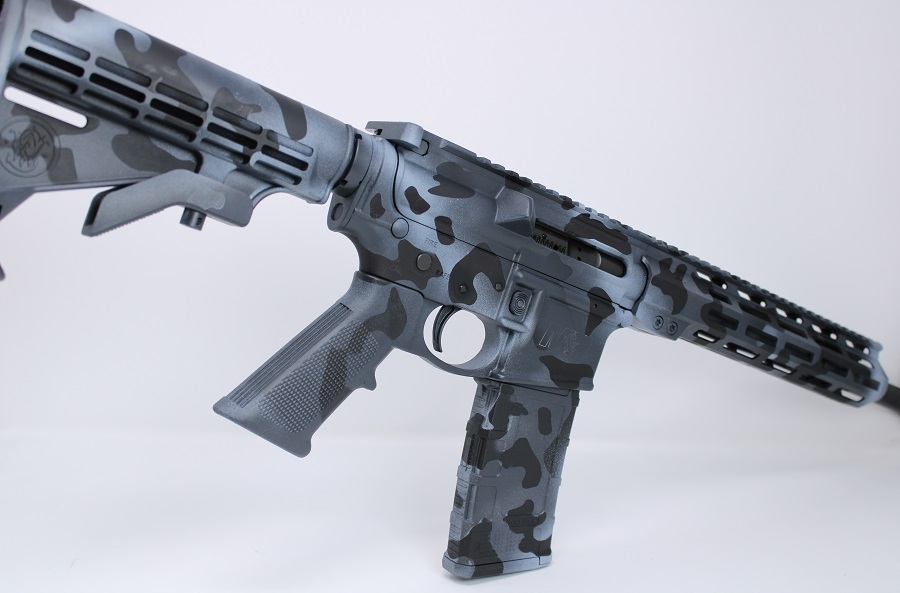
The following day, you can assemble your rifle if you removed any parts and you can lightly handle it. We recommend leaving your rifle to fully cure for at least 21 to 30 days. Duracoat will continue to cure and harden for many weeks after the application.
DISCLAIMER: If you are new to the world of DIY gun building, you likely have a lot of questions and rightfully so. It’s an area that has a lot of questions that, without the correct answers, could have some serious implications. At GunBuilders.com, we are by no means providing this content on our website to serve as legal advice or legal counsel. We encourage each and every builder to perform their own research around their respective State laws as well as educating themselves on the Federal laws. When performing your own research, please be sure that you are getting your information from a reliable source.